My triumphant (albeit slow moving) return to painting (aka the colour in our bedroom is driving me bonkers)
When we first came to look at this old mauve-coloured house nearly two years ago, I walked away thinking that the master bedroom was painted black. In fact, it’s not black. It’s brown. But it’s a dark-ish brown and the blinds were continually drawn in this room during showings (theory: the home owners were really vampires), and the colour appeared even darker and more awful than it actually is (although it is, indeed, pretty awful.)
For your viewing pleasure (or, perhaps, disbelief), here’s what our master bedroom looked like the first time we saw it…
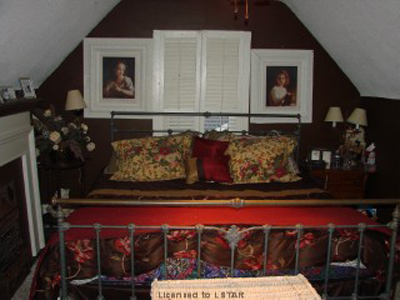
Ack, eh? Yes. Ack indeed. Flowers and nic-nacs and tiny lamps with tiny lampshades and stuff everywhere. Ev-ver-ry-where. Once again, I think it’s worth noting that we bought a house with rooms that looked like that. We’re very very very brave, my Sweetie and me.
(And yes, the two pictures hanging above the bed are indeed hung at different heights. Because lazer level be damned, willy-nilly picture hanging is how the previous house owners rolled. Those crazy loveable crooked-picture-hanging vampire-esque rebels.)
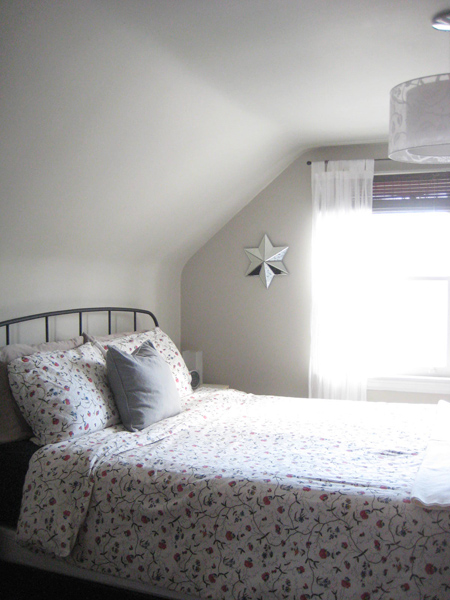
Of course, when Sweetie and I moved in, all that stuff (thankfully!) went away (and, miraculously, the room suddenly looked a gazillion times larger.) But that didn’t change the fact that the room is brown.
Icky brown, to be exact.
Here’s another look at that wall colour, minus all the clutter and with a wee bit of natural light…

Well hello there, ridiculously cute little man! :) Behind all that squishy adorableness are my ugly brown walls. A (temporarily) comfy black cat is also lounging somewhere back there. In fact, this picture was taken mere moments before I had to intervene in feline/infant interactions and declare “No, we don’t chew on the cat.” (A statement I never ever thought I’d have to make prior to having a baby.)
So what colour am I going with? Alas, I’m not being particularly original or daring with this project. Instead I’m falling back on the reliable, always lovely, Revere Pewter. I painted our bedroom at our beloved little 1940′s house this colour and I loved it.
It’s peaceful. It’s serene. It’s an actual colour and dark enough to be impactful, but not so much so that it’s overwhelming. Some have called Revere Pewter the perfect paint colour. I call it lovely and soft and well-suited for a bedroom. (And, particularly, for my bedroom.)
Now all I have to do is find the time to paint this aforementioned bedroom. With a small boy who doesn’t nap predictably (or, oftentimes, for very long), this might be a project best suited for the evening hours (once that same small sweet little man is fast asleep for the night.) Assuming, of course, that I can stay awake long enough to attack those ugly brown walls with my trusted paintbrush.
But, ahhhhh… Yup. It feels good to return to home renos, even if I now move a whole lot more slowly than before. Slow progress of any sort is still progress nonetheless. :)
Leave a comment
A quick closet makeover (another “slap some paint on it and it’ll look so much better” sort of project) (aka: paint fixes everything)
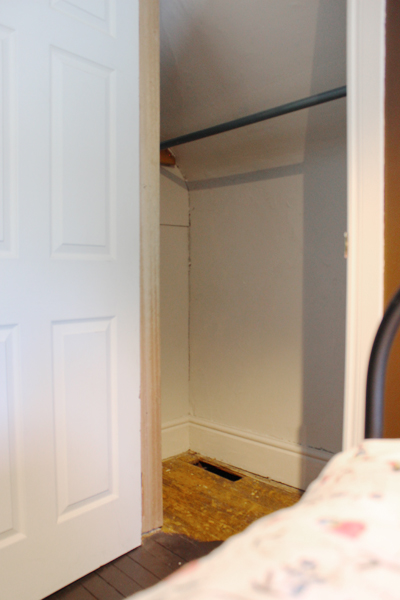
Some people have scary basements. I had a scary closet. (Well, I have a scary basement too, but that’s a whole other story for a whole other blog post.) How scary was our bedroom closet? It looked like this when we moved in…
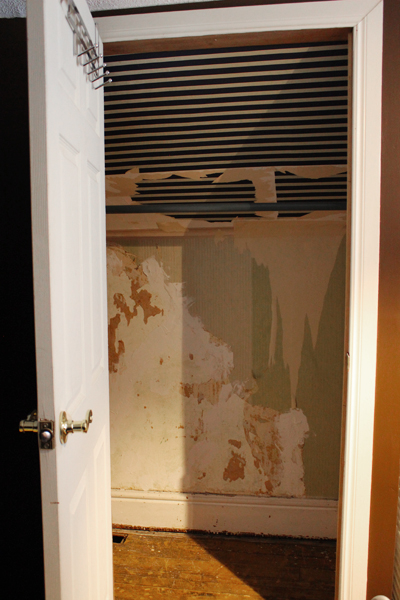
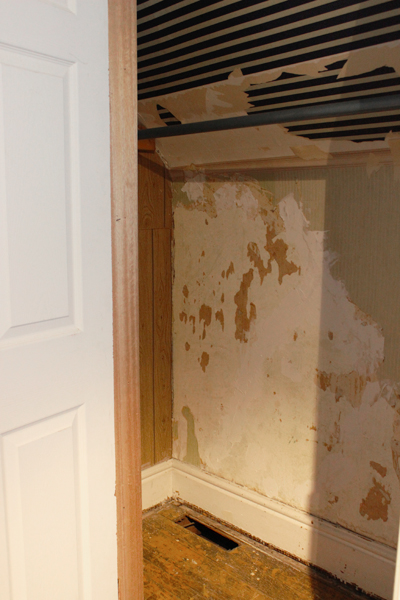
Ack. Nightmarish, eh? Yup. Absolutely terrifying.
And since “make closet pretty” wasn’t first and foremost (or even seventh and semi-important) on my big ol’ home reno to do list, it stayed that way for the past ten months. Empty. Ugly. Mocking me. Daring me to step inside (which I would never ever ever do due to the aforementioned scariness factor.)
So where were all of our clothes? In the nursery closet of course. (See where this is leading?) But, with Baby on the way in a few short weeks (yep, you guessed it), it was time to clear out that closet. Meaning that it was also time for us to face the scariness once and for all and make our bedroom closet a much more hospitable, much less horror movie-esque little place.
So what did I do?
I painted it.
And by that I mean that I really quickly and lazily painted it, using leftover Edgecomb Gray paint that I already had on hand. Did I remove the wallpaper from the walls? Nope. Did I sand down the drywall compound patching job that Sweetie did (since originally there were plaster cracks on the back wall of the closet that made it look even more terrifying?) Nope. Did I prime or prep or do anything to make the ugly innards of my closet more humane-looking? Nope. I just slapped some paint on those closet walls and called it a day.
And it didn’t turn out so bad. Behold the after…
I even tossed a quick coat of paint on the baseboards. Same colour as the walls. We’re not talking anything fancy here (it is a closet, afterall.)
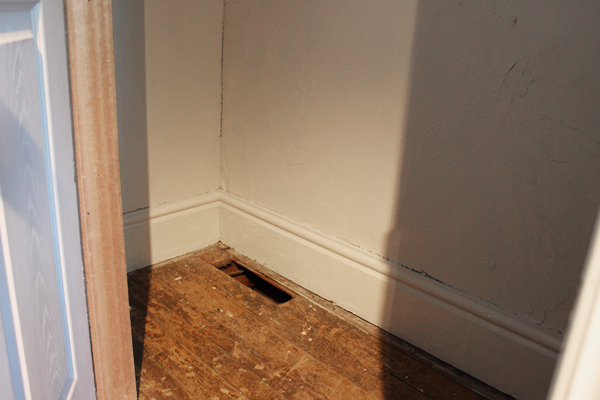
Yep. A quick coat of paint and suddenly the closet ain’t so scary any more.
(I mean, I wouldn’t want to hang out and read a book in there, of course, but it’s way better.)
So there. That’s my scary-closet-turned-not-quite-as-scary-due-to-Baby’s-impending-arrival story for you. Since I’m guessing that Baby will need its own closet.
You know, for cute little onesies and pretty dresses (if Baby is a girl) or tiny overalls (if this wiggly little belly-mover is a boy) and stuff. :)
Leave a comment
Doing the drapery dance (which doesn’t at all look like the Safety Dance) (ok, it actually kinda does, but just a little)
It’s spring! Well, sort of. I’m still wearing a winter coat on some mornings (albeit a very tight one due to my ever-growing and beloved baby bump.) And I’m keeping my toque and mitts and scarf close at hand. Just in case the weather turns wintery. Again. Since, you know, Mother Nature has cursed us with a never ending winter this year. (Dear Mother Nature… I love you, and you’re awesome, but you’re being completely irrational this year. Stop it. Please. Thank you!)
And while I despise the ridiculously cold snowy winter we’ve had this year, I despise my current window coverings even more. The previous home owners (being the insane awesome people that they are!) left us a plethora of flood-ready bright white sparkly-swirl sheers for our windows. An intended act of generosity? Perhaps. But regardless of motive, the result is the same: the curtains are making me a crazy person.
Enter: Ikea. Yep. My beloved and dependable go-to for window coverings. Their curtains are cheap. They’re very cheerful. They come in really long lengths (for those of us who prefer to set our curtain rods a tad higher than the average population.) And their curtains come in pairs (which seems to be a bit of a rarity anymore.) (But really, how many people only need one curtain?) (Cough, cough, rip off, ehem…) During an Ikea trip about a month ago I purchased no fewer than six (much needed) new drapery sets along with the accompanying curtain rods and hardware and doodads and such. After a second Ikea trip a few days later (because a certain someone with a wee bit of baby brain forgot a few crucial curtain rod components…) we finally got everything up last weekend.
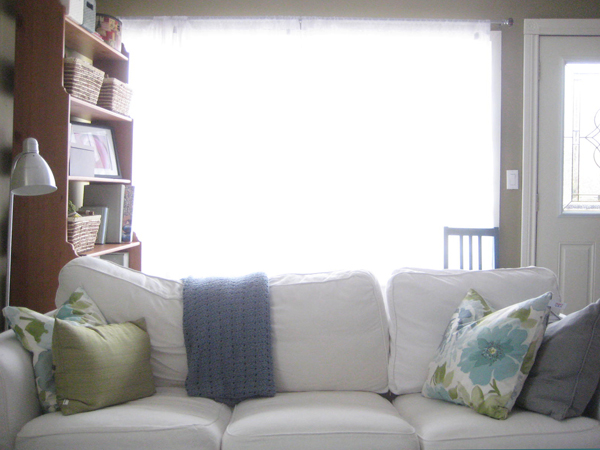
Here’s my front living room window before (with its icky swirly silver sheers all aglow):
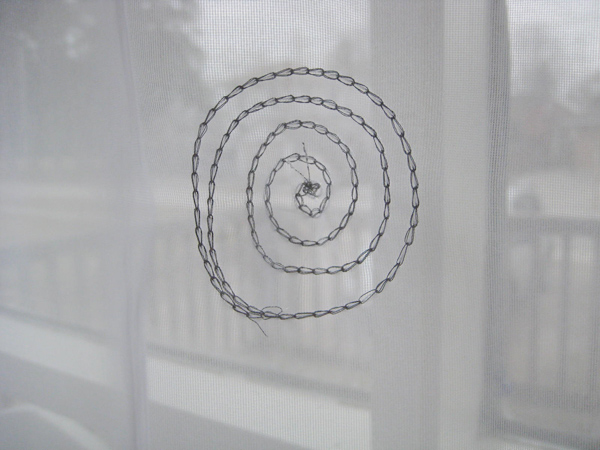
(Here’s a closeup of the sheers’ sparkly swirls, just in case you’re interested. Snazzy, eh?)
And here’s the after, featuring my all-time favourite front window drapes (Ikea’s Ritva) and a set of soft-ivory sheers (Ikea’s Teresia).
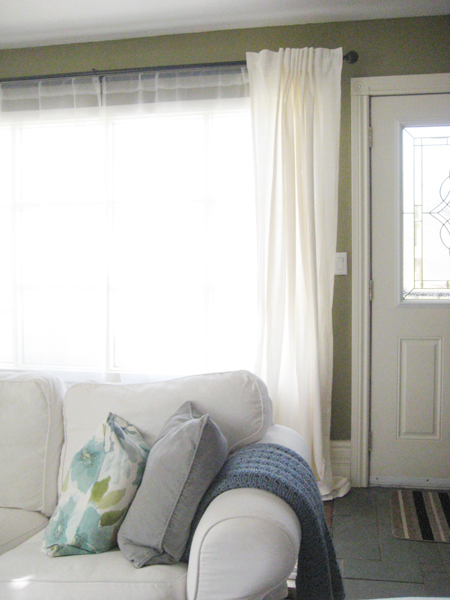
I’m a happy girl! But why did we get another pair of sheers? The glass panes in this window are no longer sealed properly (one of the hazards of buying a fixer-upper with archaic windows) so there’s condensation and dust between the panes and this window always appears dirty from the street (despite that – I promise! – it’s very very clean!) The sheers help mask that a bit, which means we’ll likely be sheer-people until we replace that entire front window (which, sadly, will be a very expensive venture) (which, also sadly, means it’s pretty far down on our list of priorities right now.)
The Ritvas are waaay too long right now (I’m all for little drapery puddles, but this is a little silly) and will likely require shortening. Tip I’ve learned? Wash and dry Ikea drapes a couple of times before shortening them. They sometimes shrink. A lot. Whenever they’ve accumulated enough kitty fur to require a trip through the laundry (which, sadly, will likely be soon) I’ll get around to making them a bit shorter. For now, however, I’m just happy that they’re not sparkly. Or swirly. Or bright white.
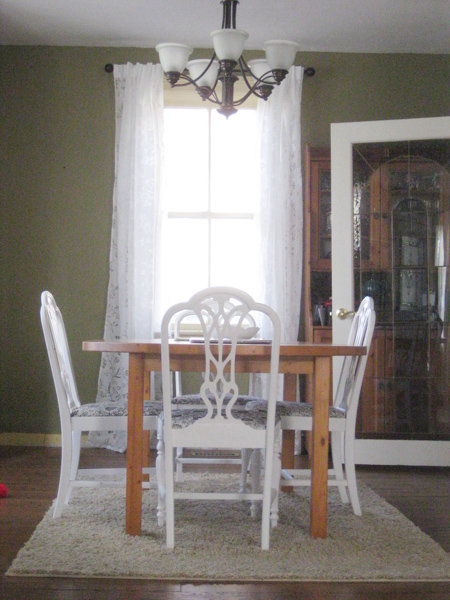
Next up? Here’s the before of my dining room window…
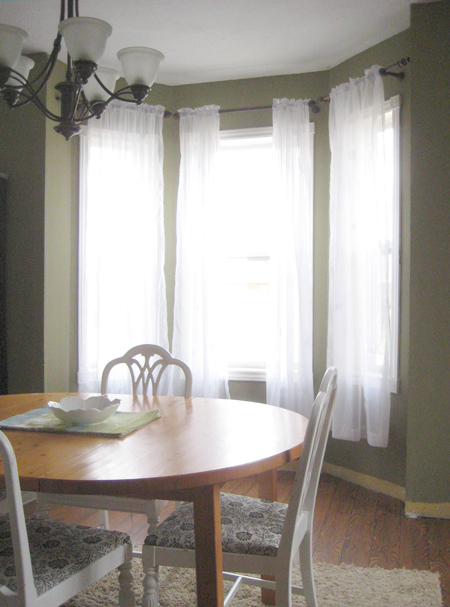
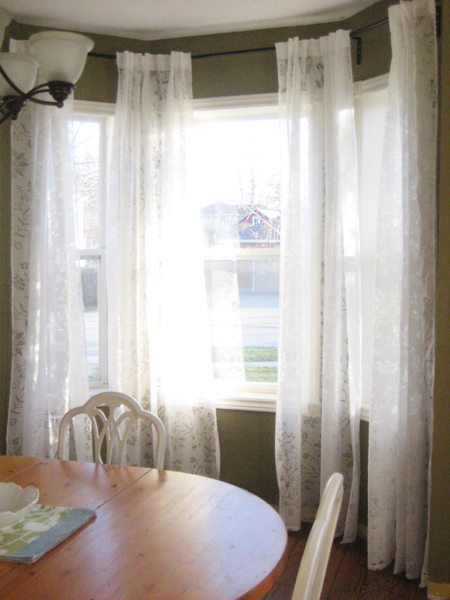
Apparently the previous owners weren’t bothered by the too-short panels (or, um, lack of baseboards) but I think the windows look much lovelier now that they’re dressed with a few Borghild panels from Ikea…
And we added the same curtains to this previously un-adorned window at the end of our dining room too. Here it is pre-curtaining…
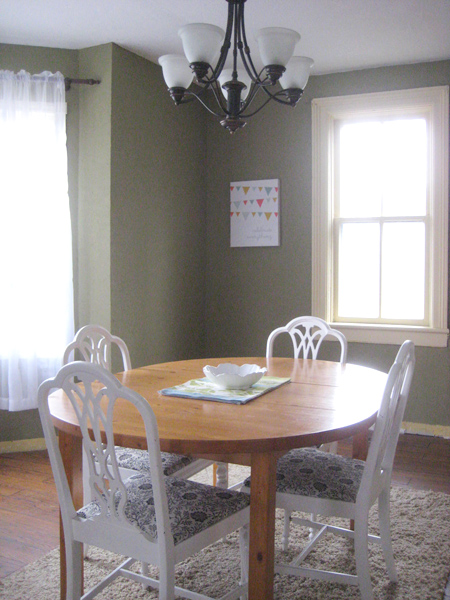
…and here’s the much improved after…
All of which makes me a very happy girl. :)
The last set of the six sets of curtains I purchased is earmarked for the baby’s room (should we ever get around to starting the nursery) (hello? Ambition? You should probably kick in about now…) If they don’t end up used in the nursery, we’ll hang them in our bedroom (since a certain black kitten has pretty much destroyed our bedroom drapes.) (He thinks bedroom curtain-clawing is a really fun pastime.) (Particularly at 5am.) (It’s a good thing he’s cute.)
And now, for your viewing pleasure (and a little post-title clarity), here’s a little Drapery Safety Dance from Men Without Hats…
…because, well, it’s really, really weird, but so fun. :)
Leave a comment
A happy hardwood discovery (and a sad tale of forgotten hardware)
This post was supposed to be a rather celebratory “the evil white sheers are gone!” sort of post about my new drapes. My six (six!) packages of wonderful, lovely, much-adored, space-transforming new drapes, to be exact. However sometimes things don’t quite work out as planned. Like, for instance, when you buy all the hardware pieces needed to assemble a curtain rod for a big bay window, and you excitedly prepare to hang everything one sunny Sunday afternoon and then realize (dun dun dun) that you’ve forgotten a critical component way back at the store. Which, unfortunately, is 1.5 hours away.
Yep. That happened this weekend. I was so sad.
Luckily, I have another trip to Ikea planned for the not-so-distant future (since baby needs a dresser/change table for his or her little room, and handsome Hemnes seems to fit the bill) so we’ll pick up the remaining (and sadly missed) drapery hardware bits during that dresser-buying mission. In the meantime, however, my bay window looks rather naked. (Although the cats are pretty happy with the curtain-less and completely unobstructed view – cats don’t really understand, or care for, drapery.)
But the weekend wasn’t entirely filled with drapery doom and gloom! While staring (woefully) at my naked dining room windows, I noticed that a piece of our (quite shoddily installed) laminate flooring had at some point come loose.
So I gave it a wee wiggle. And it moved. And, in fact, it came completely out. And look (look!) what I found underneath…
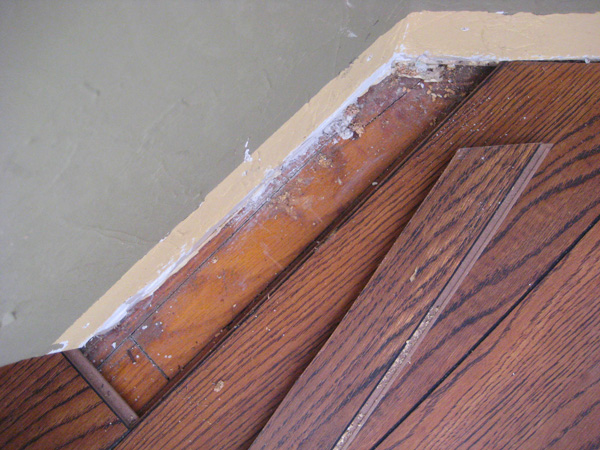
Yep. That, there, is hardwood. Not original-to-the-house beautiful 100 year old wide-plank-holy-awesomeness-pine-or-mahogany-or-something-equally-amazing hardwood, of course, but hardwood nonetheless.
I did a little happy dance. In front of my naked big bay windows. At the exact same moment that my neighbour walked by with his dog, of course. (I’m pretty sure the neighbours think we’re a bit odd.)
So our newest question? How far does the flooring extend? Is there hardwood under all of the laminate flooring in our living room/dining room? Or only under part? With the house being quite old (and without knowing what the original floorplan here looked like) the laminate could very well be hiding big ugly scars from walls that were removed and additions that were additioned over the years. Afterall, why else would you cover hardwood flooring with laminate? If it’s simply scratched up, hardwood can be refinished. And I’m not at all afraid of a few scratches. We’ve had this sort of narrow-plank hardwood flooring in both of our previous homes, and age-related scratches and dings just add a little character (if you ask me.) They scream “This house was well-loved in past years by families blessed with excited children and lively dinner parties.” If we reveal an expanse of hardwood underneath the laminate, regardless of the shape it’s in, I’ll be one happy girl.
Now, the hard part. Finding the courage to start ripping all of the existing flooring up. It’s one of those jobs that once started, can’t be stopped. It’s also one of those jobs that’ll require a really quickly executed Plan B if it turns out that the flooring underneath isn’t usable for some reason.
Maybe we’ll save that for another (much braver) day. In the meantime, I’m leaving that one small piece of laminate flooring pulled up as a reminder that something really amazing could be hiding underneath all the ugliness. Afterall, it was that same hope of hidden beauty that convinced us to buy our old mauve house in the first place. :)
Leave a comment
Brightening up a rather dark little kitchen (sad-looking semblance of a valence: be gone!) (next: let’s talk lighting)
Despite that I really love bright and sunny kitchens, the kitchen at the old mauve house is neither bright nor sunny. The kitchen window is north-facing (meaning it never catches any real sunlight) and our (inherited) wall colour is rather drab and dark (but kitchen-painting is a ways down on our list of required renos at the moment, so drab and dark will sadly stay put until “paint kitchen” comes up in the renovating queue.)
One thing that has helped increase the kitchen brightness-factor a tad? Removing THIS…

Yep. That awkward repurposed-window-but-half-valence-thingy came down recently. Not entirely because we wanted to take it down. But rather because it needed to move in order to access the window so that we could thoroughly weatherproof (since our kitchen window is definitely drafty and quite a pane.) (Get it? Pane? Pain?) (Groan… K. Carrying on…)
Initially, Sweetie didn’t like the kitchen window sans the odd-looking-not-really-a-valence, but I asked him to live with it for a while. The result? The look has grown on us both. Much more light floods into the kitchen now, and the window just looks less… odd.

Our new problem? The light over the sink. I’ve never been a huge fan of this light (or of any of the lights in this house, truth be told) (once budget permits, they’re allll getting a good swapping.) However without the quasi-valence in place, the light definitely looks odd and hangs too far down. And the yellow-hued shade makes it a wee more traditional than I’d prefer. And it’s honestly just not us.

After a little online big box store searching, I’ve narrowed the new over-the-sink light options down to a few contenders.
My absolute fave? This one from Lowes…

Pretty, no? I adore this light. To get all technical, it’s the Allen + Roth 12-in Bronze Edison-Style Pendant Light with Clear Shade. And it’s LOVELY. The chain makes the light feel… (searching for the correct words…) (let’s go with…) airy-er than it would if the light was hanging from dark solid rods. And the shape is vintage-ey, but not old-looking. It’s modern, but antique-ish.
Does that all even make sense? Likely not.
Regardless, I love this fixture and desperately want this for my kitchen. There are a couple slight hiccups, however. It’s quite large at 12 inches in diameter. I searched all over Internet-land to see whether Allen & Roth make a slightly smaller version (the dreaded “mini-pendant”, if you will) and, sadly, they do not. Secondly, 75% of the reviews for this fixture have mentioned that the amount of light it casts (with it’s maximum 60W Edison bulb) isn’t particularly great for task lighting (and doing dishes and cleaning vegetables and the other mundane things that I do around the kitchen sink definitely seem to be task-lighting sort of tasks.) Could I outfit this light with a normal run-of-the-mill clear incandescent bulb and have it look just as pretty? Maybe? I’m not sure. But it’s also the most expensive light of the lot I’m considering. At $128 it’s quite beyond my “lovely little light in the kitchen window” budget.
But I love it. A whole lot. So it’s staying on my list.
Much smaller, and also available from the good folk at Allen + Roth via Lowes is this one…

Sweetie likes this one better than the first, and, from a cost standpoint it’s mucho cheapo-er (at only $49 bucks.) But there’s that whole low-wattage Edison light issue again. And it’s very square. And there’s already a lot of squareness in my kitchen. I think I’m gravitating more toward a little spherical illumination.
Which lead me to THIS light…

Which is pretty. SO pretty! I squealed just a wee bit when I stumbled across this fixture – the green glass is just so incredibly lovely and will look amazing in my kitchen one day (once all my painting projects are all finished up.) (Eventually.) The problem? (Because there’s ALWAYS a problem?) It’s only available at Lowes.com. Or at Lowes stores in the states, I’m assuming. And I am most definitely sitting here typing away from my Canadian home, with limited access to an American Lowes store. Sigh. And, with a maximum allowance for a 40W bulb, this light would be even dimmer and less kitchen-task-friendly than the others (I keep reminding myself of that – it keeps me from getting super sad that it’s unobtainable without a jaunt across the border.)
So where does this all leave me? It leaves me mighty light-less. Sorta. The existing light works for now (and until we find another far prettier one for the space.) But now that I’ve found a few almost perfect options, I want to find the one.
More lighting obsessing to follow, I’m sure. (Sorry about that.)
Leave a comment